In UNIX
Epoch
date +%s
date +%s
cat << EOF >> /tmp/myfile.txt
Contents that are added to the file at the end
        You can indent files by spacing them appropriately
EOF
EOF (called the LimitString) is actually the very first item on the line. Do not indent, do not do anything other than make EOF begin at position #1. If you wish to indent your LimitString, you can use <<- to disable leading tabs.LimitString: cat << 'EOF' > /tmp/myfile.txtsudo: cat << 'EOF' | sudo tee /etc/http.d/my_ssl_configSearch for LVM information on all available hard drives and create all the needed entries in /dev so you can actually use them.
vgscan -v --mknodes
All recognizable LVM information were created under /dev/mapper You’ll probably see something like this:
$ ls -al /dev/mapper
total 0
drwxr-xr-x. 2 root root 100 Apr 13 13:49 .
drwxr-xr-x. 20 root root 3100 Apr 13 13:49 ..
lrwxrwxrwx. 1 root root 7 Apr 13 13:49 centos-root -> ../dm-0
lrwxrwxrwx. 1 root root 7 Apr 13 13:49 centos-swap -> ../dm-1
crw-------. 1 root root 10, 236 Apr 13 13:49 control
The volume named centos-root is the logical volume that is mounted as the root partition.
Activate your volumes:
vgchange -a y
Repair the XFS filesystem:
xfs_repair /dev/mapper/centos-root
You may receive an error stating there is an unwritten (dirty, corrupt) log. As this note from RedHat states, you may have data loss if you clear the log.
The
xfs_repairutility cannot repair an XFS file system with a dirty log. To clear the log, mount and unmount the XFS file system. If the log is corrupt and cannot be replayed, use the-Loption (“force log zeroing”) to clear the log, that is,xfs_repair -L /dev/device. Be aware that this may result in further corruption or data loss.
If you can’t mount the volume and clear your log, you will have to use -L and risk data loss.
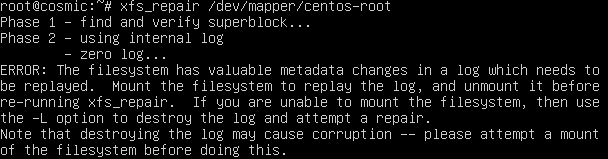 I haven’t experienced any serious data loss after using
 -L, or if I did, it wasn’t apparent to me. ** Use at your own risk **
Merging can sometimes be difficult, primarily when you have conflicts! Yikes!
Prerequisites: Add, commit, and push to your feature branch; then, attempt a merge into master. You’re left with conflicts. You are here!
First: From the command line, checkout your feature branch and attempt a merge so you can get a fresh copy of the merge conflicts.
$ git fetch origin
$ git checkout -b property-create origin/property-create
$ git merge master
Auto-merging set_properties.py
CONFLICT (content): Merge conflict in set_properties.py
Auto-merging get_properties.py
CONFLICT (content): Merge conflict in get_properties.py
Auto-merging deploy.py
CONFLICT (content): Merge conflict in deploy.py
Automatic merge failed; fix conflicts and then commit the result.
Next: Open your favorite editor and visit one of those files.
Decide which changes you want to keep, and if need be, keep a little bit of both. Oftentimes, it’s one or the other…at least in my experience. When you’re finished with one file, save your changes and move to the next. Try to keep your changes specific to what is minimally needed to resolve the merge conflicts.
Finally: When you’re ready to try again:
[feature]$ git add deploy.py get_properties.py
[feature]$ git commit -m 'fixed merge conflicts'
[feature]$ git merge master
Already up-to-date.
[feature]$ $ git checkout master
Switched to branch 'master'
[master]$ git merge --no-ff property-create
Merge made by the 'recursive' strategy.
build_promoter.py | 111 ++++++++++++++++++++++++++++++++++++++++++++++++++++++++++++++++++++++++++++-----------------------------------
set_properties.py | 92 ++++++++++++++++++++++++++++++++++++++++++++++++++------------------------------------------
2 files changed, 126 insertions(+), 77 deletions(-)
[master]$ git push origin master
Counting objects: 8, done.
Delta compression using up to 16 threads.
Compressing objects: 100% (4/4), done.
Writing objects: 100% (4/4), 1.02 KiB | 0 bytes/s, done.
Total 4 (delta 3), reused 0 (delta 0)
remote: Resolving deltas: 100% (3/3), completed with 2 local objects.
To git@github.com:build/pck-build.git
2ebfbe4..9115acf master -> master
7-Apr
In two days I will be getting my Baratza Virtuoso grinder. It is 5 years old and I’m buying it used but it’s a big step into the world of coffee snobbery! I do like a damn good cup of coffee but I grew up on truck stop coffee so anything that is “dirty water” or better, I’m pretty much okay with. Not quite but the point is, I have not forgotten from whence I came!
French press was fine with me for a while because, as my friend Dean used to say, “I like my coffee like I like my women – strong and black!” And, if there was ever a coffee that was strong and black, it’s French Press. After a while, the grit and the oil really started wreaking havoc on my stomach so I switched to pour over. I thought adding a paper filter would help trap some of the oil and make it a cleaner cup of coffee, overall. That lasted for a while until…well, that’s a long story but I’ll say there were shortcuts on the technique and attention to detail that made for a pretty blah tasting cup of coffee. I really wanted more flavor so I pulled the ol’ AeroPress out of our camping supply “kitchen” tub and started making damn good coffee, one cup at a time.
Grinding the beans, however, became the next point of contention for me. It seemed pretty easy – dump one scoop of beans in the spice grinder, run it until it felt very fine, dump into the AeroPress, and make coffee. The spice grinder method worked for many, many years. I got to be pretty good with it but ultimately, you’re going to get a wide mix of granule sizes no matter how hard you try. If you want French Press, you’re going to get some granules for espresso, some for pour over, some for French Press, and some for chucking at squirrels as they root through your planting boxes. I wanted more control over my beans.
Enter the Virtuoso. A friend acquaintance from several years before posted on Slack that he was selling his. I didn’t know that I had wanted one but because:
I thought it would be a good chance to break into the world of complete bean control!
One thing about the grinder that my friend mentioned was that the grind setting had to be made while the grinder was in the ON position. So…you had to adjust the grinder ONLY while it was grinding, thereby, wasting some amount of beans while you were switching from one setting to another. What? I cried foul and got my hands on the user manual. It definitely said something…something in one part of the manual that seemed to contradict what it was saying in another part of the manual. How can such a simple thing be described in such a complex manner? The grinder has ONE JOB – grind me beans! But exactly how to go about doing so still wasn’t clear. My brain felt betrayed by the recommendations regarding adjusting the grinder setting so I contacted the manufacturer for more information.
Their response was more than helpful:
I think it would help understand why that bit is in there. The restrictions apply to when coffee is stacked up in the hopper. Grind adjustments made from coarse to fine when the grinder is not running can be damaging to the grinder, as the rotation moves the burrs closer together with the presence of coffee beans surrounding the two burrs. However, if the grinder is running when this adjustment is made, the coffee is continually replenishing, thus no blockage happens. Grind adjustments made from fine to coarse when coffee is in the hopper and the unit is not running is not detrimental in my experience (per the grindz directions). Further, if the user does not keep coffee in the hopper at all times (if, for example, they single dose every grind like I do) the grinder can be rotated freely with the unit not running – there is nothing in the grind chamber to cause problems.
Thank you, Ryan@Baratza. Now, on to coffee excellency!
$ cat /etc/network/interfaces
# This file describes the network interfaces available on your system
# and how to activate them. For more information, see interfaces(5).

source /etc/network/interfaces.d/*

# The loopback network interface
auto lo
iface lo inet loopback

# The primary network interface
iface eno1 inet manual

auto vmbr0
iface vmbr0 inet static
  address 172.16.16.111
  netmask 255.255.255.0
  gateway 172.16.16.1
  dns-domain mydomain.local
  dns-nameservers 8.8.4.4 8.8.8.8
  bridge_ports eno1
  bridge_stp off
  bridge_fd 0
sudo killall -HUP mDNSResponder
⌘ ⇧ ․
Tips & Tricks to help get the most out of your website or the content contained within.
Screen capture to animated GIF
Or, an easier alternative to all the steps required above…LICEcap
…For Fun and Profit!
# Let's look at what we currently have before adding anything
$ ipmitool user list
ID Name              Callin Link Auth   IPMI Msg   Channel Priv Limit
1                    true   false       false      Unknown (0x00)
2 ADMIN              true   false       false      Unknown (0x00)
...

$ ipmitool user set name 3 devopsuser
$ ipmitool user list
ID  Name	     Callin  Link Auth	IPMI Msg   Channel Priv Limit
1                    true    false      false      Unknown (0x00)
2   ADMIN            true    false      false      Unknown (0x00)
3   devopsuser       true    false      false      Unknown (0x00)
...

$ ipmitool user set password 3
Password for user 3:
Password for user 3:
Set User Password command successful (user 3)
$ ipmitool channel setaccess 1 3 link=on ipmi=on callin=on privilege=4
Set User Access (channel 1 id 2) successful.
$ ipmitool user enable 3
In my lab, I began adopting serial as an alternative to IPMI and standard Layer3 management interfaces. Serial comes with its own set of problems. Mostly, redirecting to serial. There are several things to be cognizant of.